Multimodal AI Application with HuggingFace and Gradio
Project
Table of Contents
- Overview
- How the code is organized
- What does this application do?
- Technology Stack
- Project Structure
- Service Details for Multimodal AI Application
- Frontend-Backend Connection
- Error Handling and Logging
- Quick Tips
- Resources
- Project repository
Overview
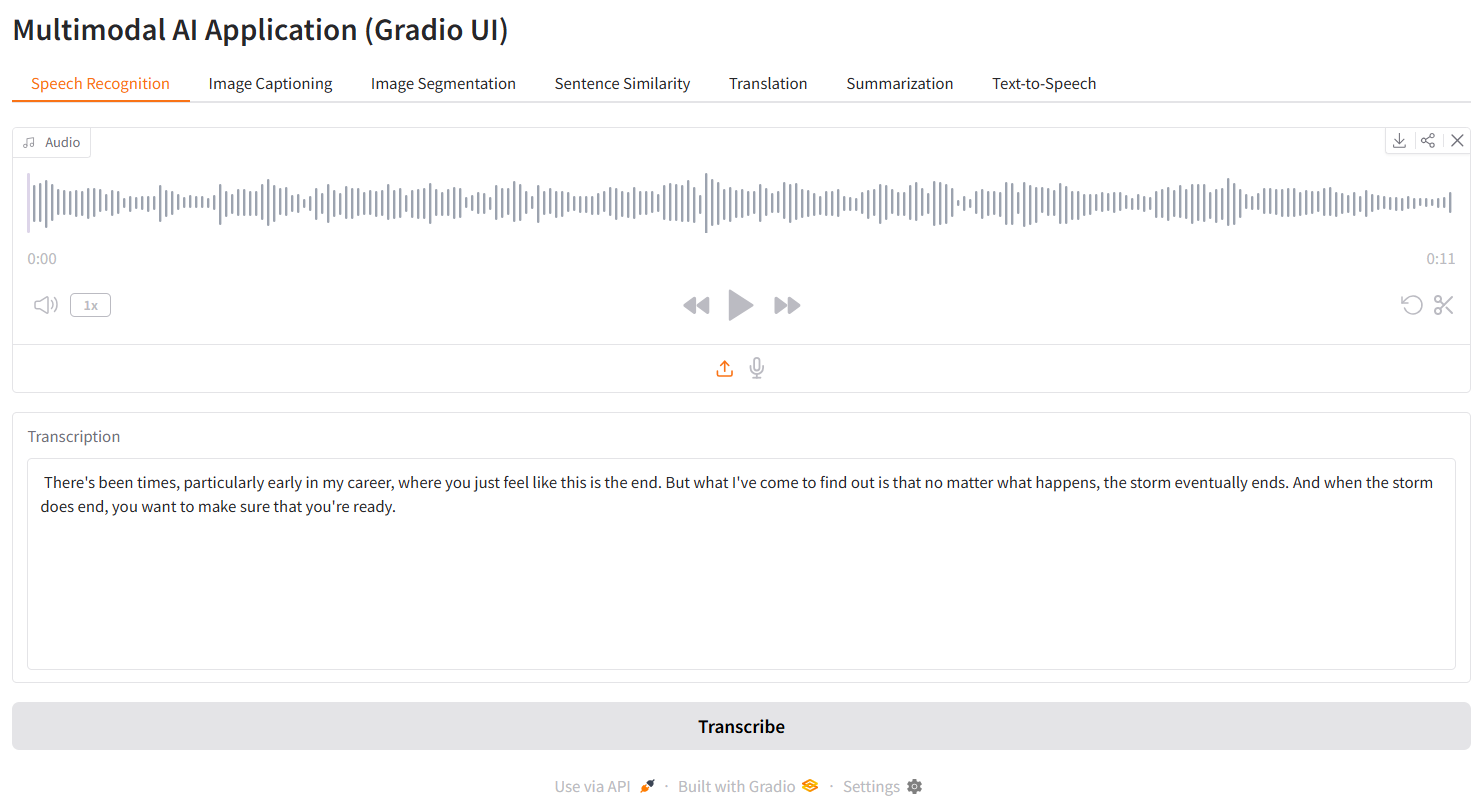
This project is a multimodal AI application that provides seven different AI services (speech recognition, image captioning, image segmentation, sentence similarity, translation, summarization, and text-to-speech) through a Gradio-based Python web interface.
How the code is organized
What does this application do?
| Service | Input | Output | Use case |
|---|---|---|---|
| Speech recognition | Audio file | Text transcription | Convert meetings to text |
| Image captioning | Image | Descriptive text | Generate alt text for images |
| Image segmentation | Image | Object masks | Identify objects in photos |
| Sentence similarity | Two text sets | Similarity scores | Find similar documents |
| Translation | Text + languages | Translated text | Translate between 200+ languages |
| Summarization | Long text | Summary | Condense articles |
| Text-to-speech | Text | Audio file | Create audiobooks |
Technology Stack
1
2
3
4
Frontend:  Gradio (Python-based UI framework)
Backend:   Python modules (no REST API by default)
AI Models: HuggingFace Transformers + PyTorch
Database:  None (stateless application)
Project Structure
The project is organized as follows:
1
2
3
4
5
6
7
8
9
10
11
12
13
14
15
16
17
18
19
20
21
22
23
24
25
26
27
28
29
30
31
32
33
34
35
36
Transformers_HuggingFace_Multimodal/
│
├── Dockerfile                # Main Docker build file
├── docker-compose.yml        # Docker Compose configuration
├── .env                      # Environment variables (HF_TOKEN, etc.)
├── README.md                 # Project overview and instructions
│
├── app/                      # Main application code
│   ├── requirement.txt       # Python dependencies
│   ├── run.py                # App entry point (if used)
│   ├── docker-usage.md       # Docker usage notes
│   ├── backend/              # Backend services
│   │   ├── config.py         # Backend configuration
│   │   ├── main.py           # Backend entry point
│   │   ├── services/         # Service modules
│   │   │   ├── image_captioning.py
│   │   │   ├── image_segmentation.py
│   │   │   ├── sentence_embeddings.py
│   │   │   ├── speech_recognition.py
│   │   │   ├── text_to_speech.py
│   │   │   ├── translation_summarization.py
│   │   └── utils/            # Utility modules
│   │       ├── file_utils.py
│   │       ├── logging.py
│   ├── frontend/             # Gradio frontend
│   │   ├── gradio_app.py     # Gradio UI app
│   │   ├── static/           # Static frontend files
│   │   │   ├── app.js
│   │   │   ├── index.html
│   │   │   ├── style.css
│   ├── data/                 # Data files
│   ├── logs/                 # Log files
│   ├── model_cache/          # Model cache directory
│
├── demo-video/# Demo file of app
│   ├── demo-app-multiai.mp4
- All service logic is in
app/backend/services/. - Frontend Gradio app is in
app/frontend/gradio_app.py. - Notebooks for demos are in
app/demo-files/. - Docker and Compose files are at the project root.
- Environment variables (including Hugging Face token) are managed via
.envand passed to Docker.
Service Details for Multimodal AI Application
This document provides a detailed overview of each AI service included in the project, including a description and important code blocks for implementation and usage.
1. Speech Recognition (Whisper)
Description:
Converts audio files into text using the Whisper model from HuggingFace. Useful for transcribing meetings, lectures, or any spoken content.
- What is Whisper?
- Whisper is an automatic speech recognition (ASR) model developed by OpenAI. It is trained on a large, diverse dataset of multilingual and multitask supervised data collected from the web. Whisper can transcribe speech in multiple languages and perform translation.
- Why Whisper?
- High accuracy across many languages and accents
- Robust to background noise and varied audio quality
- Open-source and easy to use with HuggingFace Transformers
- Other Models:
- Wav2Vec2 (Facebook/Meta)
- DeepSpeech (Mozilla)
- SpeechBrain
- Google Speech-to-Text API (cloud)
Coding:
- Libraries:
transformers(HuggingFace)torch
- Key Functions:
pipeline('automatic-speech-recognition', ...)— Loads the Whisper model pipelinepipeline(audio_input)— Transcribes audio to text
- Key Code Block:
1
2
3
4
5
6
7
8
9
10
11
12
13
14
15
16
# File: app/backend/services/speech_recognition.py
from transformers import pipeline
import torch

class SpeechRecognitionService:
    def __init__(self, model_name="openai/whisper-base"):
        self.device = "cuda" if torch.cuda.is_available() else "cpu"
        self.pipeline = pipeline(
            "automatic-speech-recognition",
            model=model_name,
            device=0 if self.device == "cuda" else -1
        )

    def transcribe(self, audio_input):
        result = self.pipeline(audio_input)
        return {"text": result["text"], "status": "success"}
2. Image Captioning (BLIP)
Description:
Generates descriptive captions for images using the BLIP model. Useful for accessibility, alt text generation, and content understanding.
- What is BLIP?
- BLIP (Bootstrapped Language-Image Pretraining) is a vision-language model designed for tasks like image captioning and visual question answering. It combines vision transformers with language models to generate descriptive captions for images.
- Why BLIP?
- State-of-the-art results on image captioning benchmarks
- Supports conditional captioning (can use extra text prompts)
- Available on HuggingFace with pretrained weights
- Other Models:
- OFA (One For All)
- VinVL
- CLIP + GPT-2/3 (for zero-shot)
- Show and Tell, Show and Attend and Tell (older)
Coding:
- Libraries:
transformers(BlipForConditionalGeneration, AutoProcessor)torchPIL(Pillow)
- Key Functions:
BlipForConditionalGeneration.from_pretrained()— Loads BLIP modelAutoProcessor.from_pretrained()— Loads image processorprocessor(image, return_tensors="pt")— Preprocesses imagemodel.generate(**inputs)— Generates caption tokensprocessor.decode()— Converts tokens to text
- Key Code Block:
1
2
3
4
5
6
7
8
9
10
11
12
13
14
15
16
# File: app/backend/services/image_captioning.py
from transformers import BlipForConditionalGeneration, AutoProcessor
from PIL import Image
import torch

class ImageCaptioningService:
    def __init__(self, model_name="Salesforce/blip-image-captioning-base"):
        self.device = "cuda" if torch.cuda.is_available() else "cpu"
        self.model = BlipForConditionalGeneration.from_pretrained(model_name).to(self.device)
        self.processor = AutoProcessor.from_pretrained(model_name)

    def generate_caption(self, image, conditional_text=None):
        inputs = self.processor(image, return_tensors="pt").to(self.device)
        output_ids = self.model.generate(**inputs)
        caption = self.processor.decode(output_ids[0], skip_special_tokens=True)
        return {"caption": caption}
3. Image Segmentation (SAM)
Description:
Segments objects in images and generates object masks using the SAM model. Useful for object detection, photo editing, and computer vision tasks.
- What is SAM?
- SAM (Segment Anything Model) is a vision model from Meta AI that can segment any object in an image with minimal user input. It is designed for general-purpose segmentation and works on a wide range of images.
- Why SAM?
- Generalizes well to new objects and scenes
- Requires little or no prompt engineering
- Fast and efficient for both research and production
- Other Models:
- DeepLabV3
- Mask R-CNN
- U-Net
- FPN (Feature Pyramid Networks)
Coding:
- Libraries:
transformers(pipeline)torchPIL(Pillow)
- Key Functions:
pipeline('mask-generation', ...)— Loads SAM segmentation pipelinepipeline(image, points_per_batch=64)— Generates object masks
- Key Code Block:
1
2
3
4
5
6
7
8
9
10
11
12
13
14
15
16
17
18
19
20
21
22
# File: app/backend/services/image_segmentation.py
from transformers import pipeline
from PIL import Image
import torch

class ImageSegmentationService:
    def __init__(self, segmentation_model="Zigeng/SlimSAM-uniform-77"):
        self.device = "cuda" if torch.cuda.is_available() else "cpu"
        self.sam_pipeline = pipeline(
            "mask-generation",
            model=segmentation_model,
            device=0 if self.device == "cuda" else -1
        )

    def segment_image(self, image_path):
        image = Image.open(image_path)
        outputs = self.sam_pipeline(image, points_per_batch=64)
        return {
            "status": "success",
            "masks": outputs["masks"],
            "scores": outputs["scores"]
        }
4. Sentence Embeddings (Similarity)
Description:
Computes similarity scores between two sets of sentences using Sentence Transformers. Useful for document similarity, search, and clustering.
- What are Sentence Transformers?
- Sentence Transformers are models based on BERT, RoBERTa, or similar architectures, fine-tuned to produce semantically meaningful sentence embeddings. They are widely used for semantic search, clustering, and similarity tasks.
- Why Sentence Transformers?
- High-quality, dense vector representations for sentences
- Pretrained models for many languages and domains
- Easy to use with the
sentence-transformerslibrary
- Other Models:
- Universal Sentence Encoder (Google)
- InferSent (Facebook)
- LASER (Facebook)
- SBERT variants (distiluse, paraphrase-MiniLM, etc.)
Sentence Transformers were chosen for their strong community support and performance in semantic similarity tasks.
Coding:
- Libraries:
sentence_transformers(SentenceTransformer, util)torch
- Key Functions:
SentenceTransformer(model_name)— Loads embedding modelmodel.encode(sentences, convert_to_tensor=True)— Generates embeddingsutil.cos_sim(embeddings1, embeddings2)— Computes cosine similarity
- Key Code Block:
1
2
3
4
5
6
7
8
9
10
11
12
13
14
15
16
17
18
19
20
21
22
# File: app/backend/services/sentence_embeddings.py
from sentence_transformers import SentenceTransformer, util
import torch

class SentenceEmbeddingService:
    def __init__(self, model_name="all-MiniLM-L6-v2"):
        self.device = "cuda" if torch.cuda.is_available() else "cpu"
        self.model = SentenceTransformer(model_name, device=self.device)

    def compute_similarity(self, sentences1, sentences2):
        embeddings1 = self.model.encode(sentences1, convert_to_tensor=True)
        embeddings2 = self.model.encode(sentences2, convert_to_tensor=True)
        similarities = util.cos_sim(embeddings1, embeddings2)
        comparisons = []
        for i, s1 in enumerate(sentences1):
            for j, s2 in enumerate(sentences2):
                comparisons.append({
                    "sentence1": s1,
                    "sentence2": s2,
                    "score": float(similarities[i][j])
                })
        return {"comparisons": comparisons}
5. Translation (NLLB)
Description:
Translates text between over 200 languages using the NLLB model. Useful for multilingual applications and global communication.
- What is NLLB?
- NLLB (No Language Left Behind) is a multilingual translation model from Meta AI, supporting over 200 languages. It is designed to provide high-quality translation for low-resource and high-resource languages alike.
- Why NLLB?
- Unmatched language coverage (200+ languages)
- Open-source and available on HuggingFace
- Strong performance on both common and rare languages
- Other Models:
- MarianMT
- mBART
- Google Translate API (cloud)
- T5 (for some translation tasks)
Coding:
- Libraries:
transformers(pipeline)torch
- Key Functions:
pipeline('translation', ...)— Loads NLLB translation pipelinepipeline(text, src_lang=..., tgt_lang=...)— Translates text
- Key Code Block:
1
2
3
4
5
6
7
8
9
10
11
12
13
14
15
16
17
18
19
# File: app/backend/services/translation_summarization.py
from transformers import pipeline
import torch

class TranslationSummarizationService:
    def __init__(self, translation_model="facebook/nllb-200-distilled-600M"):
        self.device = "cuda" if torch.cuda.is_available() else "cpu"
        self.translator = pipeline(
            "translation",
            model=translation_model,
            device=0 if self.device == "cuda" else -1
        )

    def translate(self, text, src_lang, tgt_lang):
        result = self.translator(text, src_lang=src_lang, tgt_lang=tgt_lang)
        return {
            "translated_text": result[0]["translation_text"],
            "status": "success"
        }
6. Summarization (BART)
Description:
Summarizes long texts into concise summaries using the BART model. Useful for condensing articles, reports, and documents.
- What is BART?
- BART (Bidirectional and Auto-Regressive Transformers) is a sequence-to-sequence model from Facebook AI, designed for text generation tasks like summarization, translation, and text generation.
- Why BART?
- State-of-the-art results on summarization benchmarks
- Pretrained and fine-tuned models available on HuggingFace
- Handles both extractive and abstractive summarization
- Other Models:
- T5 (Text-to-Text Transfer Transformer)
- Pegasus
- GPT-3/4 (for zero-shot, cloud)
- LED (Longformer Encoder-Decoder)
Coding:
- Libraries:
transformers(pipeline)
- Key Functions:
pipeline('summarization', ...)— Loads BART summarization pipelinepipeline(text, max_length=..., min_length=...)— Summarizes text
- Key Code Block:
1
2
3
4
5
6
7
8
9
10
11
12
13
14
15
16
17
18
19
20
21
22
# File: app/backend/services/translation_summarization.py
from transformers import pipeline

class TranslationSummarizationService:
    def __init__(self, summarization_model="facebook/bart-large-cnn"):
        self.summarizer = pipeline(
            "summarization",
            model=summarization_model,
            device=0 if torch.cuda.is_available() else -1
        )

    def summarize(self, text, max_length=130, min_length=30):
        result = self.summarizer(
            text,
            max_length=max_length,
            min_length=min_length,
            do_sample=False
        )
        return {
            "summary": result[0]["summary_text"],
            "status": "success"
        }
7. Text-to-Speech (VITS, gTTS)
Description:
Converts text into spoken audio using either transformer-based models or Google TTS. Useful for audiobooks, accessibility, and voice applications.
- What are these models?
- Transformer-based TTS models (like VITS) use deep learning to generate natural-sounding speech from text. Google TTS (gTTS) is a cloud-based service for converting text to speech.
- Why VITS or gTTS?
- VITS: High-quality, neural speech synthesis, open-source
- gTTS: Simple, fast, and supports many languages via Google Cloud
- Other Models:
- Tacotron 2
- FastSpeech 2
- ESPnet TTS
- Coqui TTS
- Amazon Polly, Microsoft Azure TTS (cloud)
Coding:
- Libraries:
transformers(pipeline)gttspyttsx3(optional)
- Key Functions:
pipeline('text-to-speech', ...)— Loads VITS TTS pipelinepipeline(text)— Synthesizes speechgTTS(text=text, lang='en')— Google TTS synthesistts.save(output_path)— Saves audio file
Key Code Block:
1
2
3
4
5
6
7
8
9
10
11
12
13
14
15
16
17
18
19
20
21
22
# File: app/backend/services/text_to_speech.py
from transformers import pipeline
from gtts import gTTS
import pyttsx3

class TextToSpeechService:
    def __init__(self, backend="transformers"):
        self.backend = backend
        if backend == "transformers":
            self.tts_pipeline = pipeline(
                "text-to-speech",
                model="kakao-enterprise/vits-ljs"
            )

    def synthesize(self, text, output_path):
        if self.backend == "gTTS":
            tts = gTTS(text=text, lang='en')
            tts.save(output_path)
        elif self.backend == "transformers":
            speech = self.tts_pipeline(text)
            # Save audio file as needed
        return {"status": "success", "output_path": output_path}
Frontend-Backend Connection:
This project uses Gradio as the main interface between the user (frontend) and the AI services (backend). Here’s how the connection works:
- Gradio UI is defined in Python (
app/frontend/gradio_app.py). - Each AI service is exposed as a Python function or class method.
- Gradio automatically generates a web interface for each function, handling file uploads, text input, and output display.
- When a user interacts with the web UI (uploads a file, enters text, clicks a button), Gradio sends the input directly to the corresponding Python function.
- The backend function processes the input, runs the model, and returns the result to Gradio, which displays it in the browser.
Example: Image Captioning Flow:
- User Action: User uploads an image and clicks the “Caption” button in the Gradio web UI.
- Frontend: Gradio collects the image and any optional text input.
- Backend: Gradio calls the
generate_captionfunction inimage_captioning.pywith the uploaded image as input. - Processing: The backend loads the BLIP model (if not already loaded), processes the image, and generates a caption.
- Result: The caption is returned to Gradio, which displays it in the browser.
No REST API Needed:
- Gradio handles all communication between the browser and backend Python code.
- There is no need to write or maintain a separate REST API or JavaScript frontend for the default setup.
- For advanced use cases (custom frontend, REST API), you can extend the backend with Flask or FastAPI and connect via HTTP endpoints.
File Uploads and Outputs:
- Gradio supports file uploads (images, audio, etc.) and returns files (audio, images, text) as outputs.
- All data transfer is handled securely by Gradio’s internal mechanisms.
Error Handling and Logging
Robust error handling and logging are essential for maintaining, debugging, and extending AI applications. Here’s how these are managed in this project:
Error Handling
- Each backend service function uses try/except blocks to catch and handle errors gracefully.
- Common error types handled include:
- Missing or invalid input files
- Model loading failures
- Inference errors (e.g., out-of-memory, unsupported input)
- Value and type errors
- When an error occurs, the backend returns a structured error message (e.g.,
{"error": "No image file provided"}) to the frontend. - The Gradio UI displays error messages to the user in a clear, user-friendly way.
- For advanced setups (Flask/FastAPI), HTTP status codes (400, 404, 500) are used for more granular error reporting.
Example: Error Handling in a Service
1
2
3
4
5
6
7
8
9
10
11
@self.flask_app.route('/api/speech-recognition', methods=['POST'])
def speech_recognition():
    try:
        if 'audio' not in request.files:
            return jsonify({"error": "No audio file provided"}), 400
        audio_file = request.files['audio']
        result = self.ai_app.speech_recognition.transcribe(audio_file)
        return jsonify(result)
    except Exception as e:
        logger.error(f"Speech recognition error: {e}")
        return jsonify({"error": str(e)}), 500
Logging
- Logging is set up using Python’s built-in
loggingmodule (seeapp/backend/utils/logging.py). - Logs are written both to the console and to a file (
logs/app.log). - Log levels used:
INFOfor general events (startup, shutdown, successful requests)WARNINGfor recoverable issuesERRORfor failures and exceptionsDEBUGfor detailed troubleshooting (optional)
- Logs include timestamps, module names, and message details for easy tracing.
Example: Logging Setup
1
2
3
4
5
6
7
8
9
10
11
12
13
14
import logging
from pathlib import Path

def setup_logging(log_level='INFO'):
    log_dir = Path('./logs')
    log_dir.mkdir(exist_ok=True)
    logging.basicConfig(
        level=getattr(logging, log_level),
        format='%(asctime)s - %(name)s - %(levelname)s - %(message)s',
        handlers=[
            logging.FileHandler(log_dir / 'app.log'),
            logging.StreamHandler()
        ]
    )
Application Lifecycle
The typical lifecycle of this multimodal AI application consists of the following stages:
- Startup
- The main entry point (
run.pyor Gradio app) is executed. - Logging is initialized (logs directory and file handlers are set up).
- The main application object is created (models are not loaded yet—lazy loading is used).
- The Gradio server (or Flask/FastAPI if extended) starts and listens for incoming requests on the specified port (default: 7860).
- The main entry point (
- Runtime
- The application accepts user requests via the Gradio web UI.
- When a user selects a service and submits input, the corresponding backend function is called.
- Models are loaded on first use (lazy loading), minimizing startup time and memory usage.
- Each request is processed, results are returned to the frontend, and logs are written for each event and error.
- Multiple requests can be handled concurrently (threaded by Gradio or the web server).
- Shutdown
- The application is stopped via Ctrl+C (local) or
docker stop(containerized). - Resources are cleaned up, and the server exits gracefully.
- Logs are saved for later review and debugging.
- The application is stopped via Ctrl+C (local) or
Quick Tips
Tip 1: Why having __init__.py?
- Adding
__init__.pyfiles in Python directories marks them as packages, enabling clean and concise imports. - It allows you to control what is exported from a package and simplifies import statements across the project.
- Example:
1
2
3
4
# With __init__.py
from backend import MultimodalAIApp
# Instead of
from backend.main import MultimodalAIApp
- This improves maintainability and code organization.
Tip 2: Lazy loading explained
- Lazy loading means models are not loaded into memory until they are actually needed (first use).
- This results in much faster application startup and lower memory usage, especially when many large models are available but not all are used every session.
- Only the requested service/model is loaded, improving efficiency.
-
Example:
1
2
3
4
5
6
7
8
class MultimodalAIApp:
    def __init__(self):
        self._speech_recognition = None
    @property
    def speech_recognition(self):
        if self._speech_recognition is None:
            self._speech_recognition = SpeechRecognitionService()
        return self._speech_recognition
Tip 3: Why Flask instead of Gradio?
- Gradio is ideal for rapid prototyping, demos, and when you want a Python-only workflow with auto-generated UIs.
- Flask (or FastAPI) is better for production, custom UIs, and when you need full control over the frontend, authentication, or integration with other web services.
- Gradio is used by default for simplicity, but the backend can be extended with Flask for advanced use cases.
Tip 4: When use the static folder?
The frontend/static folder is currently not used in this project. All user interaction is handled through Gradio, which generates the web UI directly from Python code. The static folder is kept in the repository in case you want to build a custom static frontend (HTML/JS/CSS) or a REST API (e.g., with Flask or FastAPI) in the future. If you switch to a static frontend, you would serve files from this folder and connect to the backend via HTTP endpoints.
- Gradio vs Static Frontend + Flask: Key Differences
| Feature | Gradio | Static Frontend + Flask |
|---|---|---|
| UI Development | Python only | HTML/JS/CSS + Python |
| API Layer | Not needed (function calls) | Required (REST endpoints) |
| Customization | Limited (but fast) | Full control (but more work) |
| Deployment | Single Python process | Separate frontend/backend, more config |
| Best for | Prototyping, demos, quick apps | Production, custom UIs, integrations |
In summary: - Gradio lets you build and launch a web UI for your models entirely in Python, with no need for HTML/JS or REST APIs. It’s fast for prototyping and demos. - A static frontend + Flask gives you full control over the UI and API, but requires more code and setup. Use this if you need a highly customized interface or want to integrate with other web services.
Tip 5: What if use Flask/FlaskAPI?
- For production or custom UIs, consider switching to Flask/FastAPI + static frontend.
1
2
3
4
5
6
7
8
9
10
11
12
13
14
15
16
17
18
19
20
21
22
23
24
25
26
27
28
29
30
31
32
33
34
35
36
37
38
39
40
41
42
43
44
45
┌─────────────┐
│  (Client)   │
└──────┬──────┘
	   │ 1. HTTP Request
	   ▼
┌─────────────────────┐
│  Flask Web Server   │
│   (frontend/api.py) │
└──────┬──────────────┘
	   │ 2. Route to endpoint
	   ▼
┌─────────────────────┐
│   Flask Endpoint    │
│ /api/image-caption  │
└──────┬──────────────┘
	   │ 3. Parse request and files
	   ▼
┌─────────────────────┐
│  MultimodalAIApp    │
│  (backend/main.py)  │
└──────┬──────────────┘
	   │ 4. Load service (lazy)
	   ▼
┌─────────────────────┐
│   AI Service        │
│ ImageCaptioning     │
└──────┬──────────────┘
	   │ 5. Load model (first time)
	   ▼
┌─────────────────────┐
│  Transformer Model  │
│   (BLIP/Whisper)    │
└──────┬──────────────┘
	   │ 6. Process input
	   ▼
┌─────────────────────┐
│   Return Result     │
│  {"caption": "..."} │
└──────┬──────────────┘
	   │ 7. JSON Response
	   ▼
┌─────────────────────┐
│   Browser Display   │
│   JavaScript DOM    │
└─────────────────────┘
The detailed request/response flow for image captioning:
1
2
3
4
5
6
7
8
9
10
11
12
13
14
15
16
17
18
19
20
21
22
23
24
25
26
27
Frontend JavaScript                Backend Flask
-------------------                --------------

User uploads image.jpg
	↓
FormData created
	↓
formData.append('image', file)
	↓
fetch('/api/image-captioning')
	↓
	├──────────────────────────→  @app.route('/api/image-captioning')
									  ↓
								  request.files['image']
									  ↓
								  Image.open(file.stream)
									  ↓
								  AI processing (generate_caption)
									  ↓
								  jsonify({"caption": "A dog playing in the park"})
	←──────────────────────────┤
	↓
response.json()
	↓
data.caption
	↓
Update DOM: display result in #caption-result div
Resources
Official documentation:
| Library | Purpose | Link |
|---|---|---|
| HuggingFace Transformers | AI Models | huggingface.co/docs/transformers |
| PyTorch | Deep Learning | pytorch.org/docs |
| Flask | Web Framework | flask.palletsprojects.com |
| Sentence Transformers | Embeddings | sbert.net |
| Gradio | Web UI for ML | gradio.app/docs |
Model cards:
| Model | Task | Link |
|---|---|---|
| Whisper | Speech recognition | huggingface.co/openai/whisper-base |
| BLIP | Image captioning | huggingface.co/Salesforce/blip-image-captioning-base |
| SlimSAM | Segmentation | huggingface.co/Zigeng/SlimSAM-uniform-77 |
| NLLB-200 | Translation | huggingface.co/facebook/nllb-200-distilled-600M |
| BART | Summarization | huggingface.co/facebook/bart-large-cnn |
| VITS | Text-to-speech | huggingface.co/kakao-enterprise/vits-ljs |
Project repository
GitHub Code: Transformers HuggingFace Multimodal