Azure AI Vision: Full-Stack Azure Vision AI Application: Architecture, Services, and Implementation
Project
Table of Contents
- Introduction
- Overview
- Structure
- Request flow
- Service mapping
- Develope Services
- How Flask connects to the services
- Quick Notes
- Resources
- Project repository
Introduction
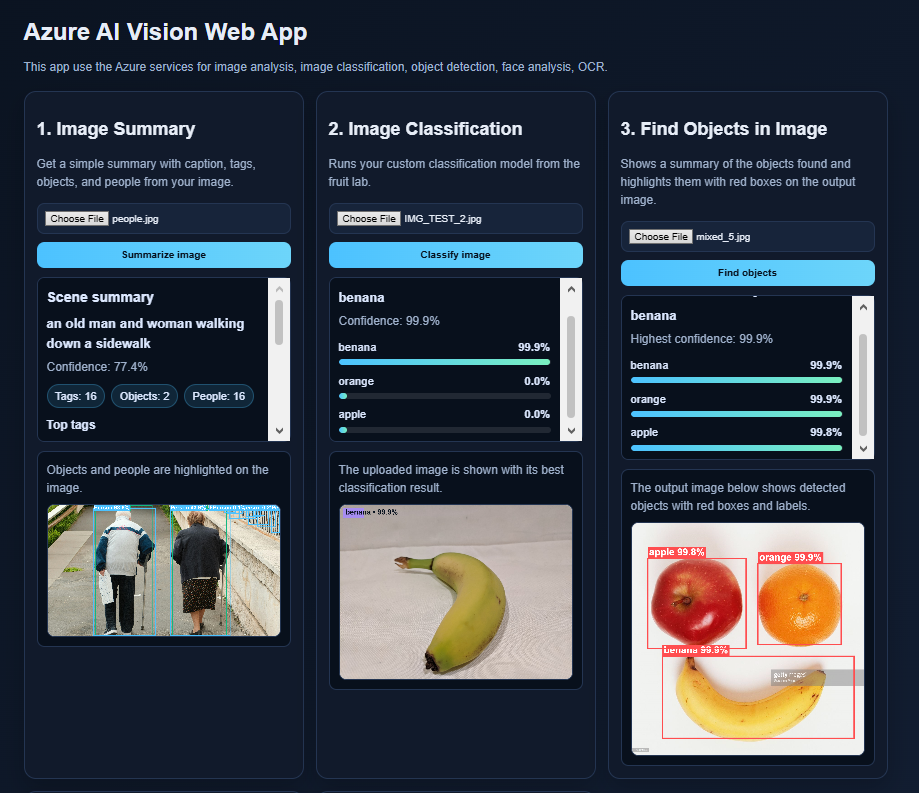
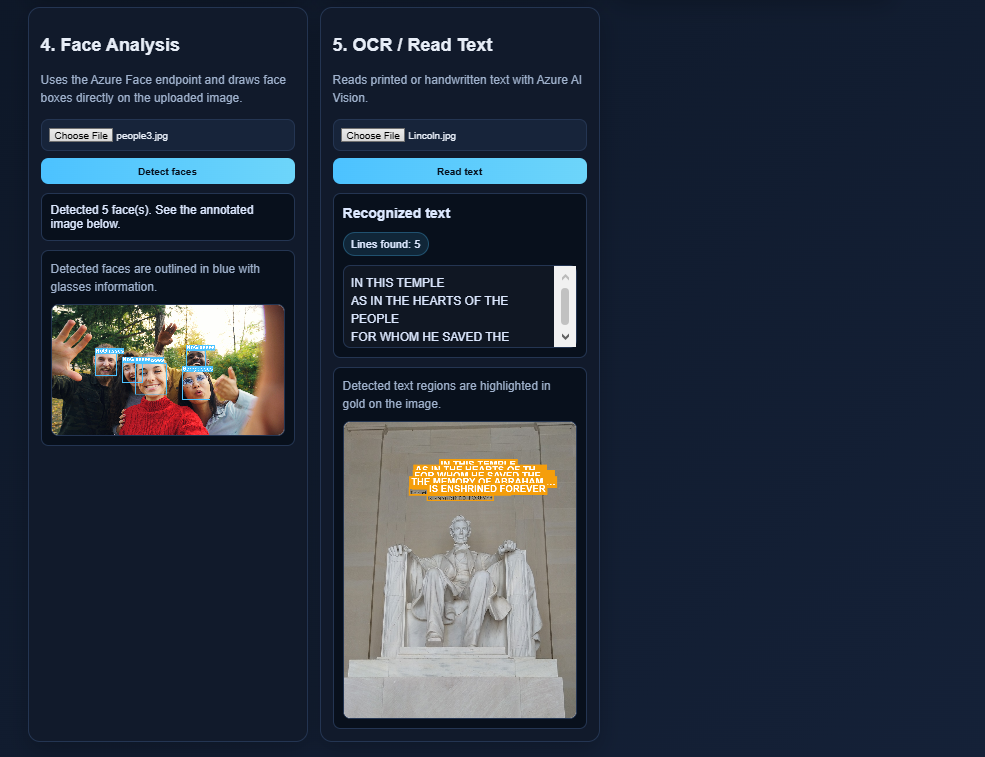
This project is a full-stack Azure Vision AI application that combines multiple computer vision capabilities into one interactive web interface. It allows users to upload an image and run different Azure-powered features such as image analysis, classification, object detection, OCR, and face analysis through a simple browser-based experience.
Overview
This page explains how the application is organized, how requests move between the frontend and backend, and how each Azure service is integrated into the system. It covers the main architecture, service mapping, required environment variables, and important code blocks used to connect the app to Azure AI Vision, Custom Vision, and Face-related APIs.
Structure
- Frontend: HTML, CSS, JavaScript
- Backend: Python + Flask
- Container runtime: Docker Compose
- Azure services used:
- Azure AI Vision Image Analysis
- Azure AI Vision OCR / Read
- Custom Vision Image Classification
- Custom Vision Object Detection
- Face API
Request flow
- The user opens the app at
http://127.0.0.1:5000. templates/index.htmlshows the feature cards.static/app.jssends the uploaded image to a Flask API route.app.pyreceives the request and calls the correct service function.- The service module reads values from
.envand sends the image to Azure. - The result is converted into JSON and returned to the browser.
- The UI shows either a summary, confidence scores, or an annotated output image.
Service mapping
| Feature | API route | Backend file | Azure resource | Required settings |
|---|---|---|---|---|
| Image summary | /api/analyze-image |
services/azure_vision.py |
Azure AI Services / Vision | AI_SERVICE_ENDPOINT, AI_SERVICE_KEY |
| Image classification | /api/classify-image |
services/custom_vision.py |
Custom Vision Prediction | CLASSIFICATION_PREDICTION_ENDPOINT, CLASSIFICATION_PREDICTION_KEY, CLASSIFICATION_PROJECT_ID, CLASSIFICATION_MODEL_NAME |
| Object detection | /api/detect-objects |
services/custom_vision.py |
Custom Vision Prediction | OBJECT_DETECTION_PREDICTION_ENDPOINT, OBJECT_DETECTION_PREDICTION_KEY, OBJECT_DETECTION_PROJECT_ID, OBJECT_DETECTION_MODEL_NAME |
| Face analysis | /api/detect-faces |
services/face_service.py |
Face API or Azure AI Services | FACE_API_ENDPOINT, FACE_API_KEY |
| OCR / Read text | /api/read-text |
services/ocr_service.py |
Azure AI Services / Vision | AI_SERVICE_ENDPOINT, AI_SERVICE_KEY |
Develope Services:
This section provides an overview of each service along with example code. For Azure portal setup and more detailed information about each service, including required settings, configuration steps, and usage instructions, please refer to the document Azure AI Vision Services: Setup and Model Development Guide (Analysis, Classification, Detection, OCR, Face), which offers a comprehensive guide to provisioning and using Azure AI Services.
1) Image Summary Service – services/azure_vision.py
Settinng in the Azure Protal
The purpose of this service is to generate a general summary of an uploaded image by producing outputs such as a descriptive caption, relevant tags, detected objects, and identified people within the image. Additionally, you must configure the required environment settings, including the AI service endpoint and API key, which enable your application to securely connect to and interact with the Azure AI Vision service.
AI_SERVICE_ENDPOINT=https://<your-resource>.cognitiveservices.azure.com/
AI_SERVICE_KEY=<your-key>
Important code block
1
2
3
4
5
6
7
8
9
10
11
12
def analyze_image(image_data: bytes) -> dict[str, Any]:
    client = _build_client()
    result = client.analyze(
        image_data=image_data,
        visual_features=[
            VisualFeatures.CAPTION,
            VisualFeatures.DENSE_CAPTIONS,
            VisualFeatures.TAGS,
            VisualFeatures.OBJECTS,
            VisualFeatures.PEOPLE,
        ],
    )
This is the main Azure AI Vision call for the image summary feature. It sends the uploaded image bytes to Azure and asks for several visual features in one request. After Azure returns the response, the rest of the file formats the caption, tags, objects, and people into a JSON structure that the frontend can display clearly.
2) Image Classification Service – services/custom_vision.py
Settinng in the Azure Protal
The purpose of this service is to predict the most appropriate label for an image using a published Custom Vision classification model. Proper configuration is required to connect your application to the deployed model, including specifying the prediction endpoint, prediction key, project ID, and the name of the published model iteration. These settings ensure that your application can securely send images to the Custom Vision service and receive accurate classification results.
CLASSIFICATION_PREDICTION_ENDPOINT=https://<your-resource>.cognitiveservices.azure.com/
CLASSIFICATION_PREDICTION_KEY=<prediction-key>
CLASSIFICATION_PROJECT_ID=<project-guid>
CLASSIFICATION_MODEL_NAME=<published-iteration-name>
Important code block
1
2
3
def classify_image(image_data: bytes) -> dict[str, Any]:
    client, project_id, model_name = _build_prediction_client("CLASSIFICATION")
    result = client.classify_image(project_id, model_name, image_data)
This block connects to the Custom Vision prediction endpoint and asks the published classification model to label the image. The service then sorts the returned predictions by confidence so the frontend can show the best match first along with a confidence bar list.
Important note: CLASSIFICATION_MODEL_NAME must match the published iteration name in Azure. If it does not match, Azure may return Invalid iteration.
3) Object Detection Service – services/custom_vision.py
Settinng in the Azure Protal
The purpose of this service is to detect and localize objects within an image by returning both the predicted label and the corresponding bounding box coordinates for each identified object. It leverages a trained and published Custom Vision object detection model to analyze visual content and provide detailed insights about multiple objects in a single image. Proper configuration of the required environment settings, including the prediction endpoint, prediction key, project ID, and published model name, which is essential to securely connect your application to the deployed model. Once configured, your application can send images to the service and receive structured detection results, including object labels, confidence scores, and precise bounding box locations, which are useful for tasks such as image understanding, automation, and visual analytics.
OBJECT_DETECTION_PREDICTION_ENDPOINT=https://<your-resource>.cognitiveservices.azure.com/
OBJECT_DETECTION_PREDICTION_KEY=<prediction-key>
OBJECT_DETECTION_PROJECT_ID=<project-guid>
OBJECT_DETECTION_MODEL_NAME=<published-iteration-name>
Important code block
1
2
3
4
5
6
7
8
9
10
11
12
13
14
15
16
17
18
def detect_objects(image_data: bytes) -> dict[str, Any]:
    client, project_id, model_name = _build_prediction_client("OBJECT_DETECTION")
    result = client.detect_image(project_id, model_name, image_data)

    predictions: list[dict[str, Any]] = []
    for prediction in result.predictions:
        predictions.append(
            {
                "tag_name": prediction.tag_name,
                "probability": round(prediction.probability * 100, 2),
                "bounding_box": {
                    "left": round(prediction.bounding_box.left, 4),
                    "top": round(prediction.bounding_box.top, 4),
                    "width": round(prediction.bounding_box.width, 4),
                    "height": round(prediction.bounding_box.height, 4),
                },
            }
        )
This is the core object detection logic. Azure returns a list of detected objects, and each object includes a tag name, confidence score, and normalized bounding box coordinates. The frontend uses these bounding box values to draw red rectangles and labels on the output image.
4) Face Analysis Service – services/face_service.py
Settinng in the Azure Protal
The purpose of this service is to send an uploaded image to the Face API and return detected face regions (face rectangles) along with selected facial attributes such as age, gender, emotion, and other supported features. Proper configuration of the required environment settings, including the Face API endpoint and API key, which is necessary to securely connect your application to the service. If these values are not explicitly provided, the service can fall back to the general AI service endpoint and key.
It is important to note that the Face API has responsible AI and access limitations. By default, only a subset of face detection capabilities (such as basic face detection and limited attributes) may be available. Access to more advanced features—such as certain facial attributes, identification, or verification capabilities—may require submitting an application and receiving approval from Microsoft. This process ensures that the technology is used in compliance with ethical guidelines and privacy regulations. Once approved, you can unlock additional capabilities for more advanced face analysis scenarios.
FACE_API_ENDPOINT=https://<your-resource>.cognitiveservices.azure.com/
FACE_API_KEY=<your-key>
If these values are not provided, the service falls back to:
AI_SERVICE_ENDPOINT
AI_SERVICE_KEY
Important code block
1
2
3
4
5
6
7
8
9
10
11
12
13
response = requests.post(
    face_url,
    params={
        "returnFaceId": "false",
        "returnFaceAttributes": "glasses,blur,exposure,headpose,noise",
    },
    headers={
        "Ocp-Apim-Subscription-Key": key,
        "Content-Type": "application/octet-stream",
    },
    data=image_data,
    timeout=60,
)
This block sends the raw image bytes to the Azure Face endpoint using a REST request. The returnFaceAttributes parameter tells Azure which face details to include in the response. After the request succeeds, the service extracts the face rectangles and attributes so the UI can highlight each face and show useful information.
5) OCR / Read Text Service – services/ocr_service.py
Settinng in the Azure Protal
The purpose of this service is to extract and recognize both printed and handwritten text from an uploaded image using Optical Character Recognition (OCR) capabilities. It enables applications to convert visual text into machine-readable format, making it useful for scenarios such as document digitization, form processing, and information extraction. Proper configuration of the required environment settings, including the AI service endpoint and API key, which is necessary to securely connect your application to the service.
This OCR service supports multiple languages and can handle a variety of input types, including scanned documents, photos, and mixed handwritten/printed content. It may also return additional structured information such as text lines, words, and their spatial locations within the image. Advanced capabilities, such as layout analysis and reading complex documents, may vary depending on the API version and service tier, but overall it provides a powerful solution for transforming unstructured visual text into structured, usable data.
AI_SERVICE_ENDPOINT=https://<your-resource>.cognitiveservices.azure.com/
AI_SERVICE_KEY=<your-key>
Important code block
1
2
3
4
5
6
def read_text(image_data: bytes) -> dict[str, Any]:
    client = _build_client()
    result = client.analyze(
        image_data=image_data,
        visual_features=[VisualFeatures.READ],
    )
This is the core OCR request. It tells Azure AI Vision to run the READ feature on the image. The rest of the file loops through the returned text blocks and lines, converts their polygon coordinates into simpler bounding boxes, and returns both the text and its positions for display in the UI.
How Flask connects to the services
The routes in app.py are the entry point for all service calls.
Important code block
1
2
3
4
5
6
7
8
9
10
11
@app.post("/api/analyze-image")
def api_analyze_image():
    return _handle_service(lambda: analyze_image(_read_upload()))

@app.post("/api/classify-image")
def api_classify_image():
    return _handle_service(lambda: classify_image(_read_upload()))

@app.post("/api/detect-objects")
def api_detect_objects():
    return _handle_service(lambda: detect_objects(_read_upload()))
This routing pattern keeps the Flask app clean. Each route reads the uploaded file once, passes it to the correct service, and returns a consistent JSON response to the frontend.
Quick Notes
How To Run
Local Python
1
2
pip install -r requirements.txt
python app.py
Docker
1
docker compose up --build -d
Open the app at:
1
http://127.0.0.1:5000
To stop it:
1
docker compose down
Security note
- Keep real credentials in
.envonly. - Keep
.env.exampleas a safe template with placeholder values. - If any real key was exposed, rotate it in the Azure Portal.
Troubleshooting
Invalid iteration
For classification or object detection, this usually means the published model name is wrong.
Check:
CLASSIFICATION_MODEL_NAMEOBJECT_DETECTION_MODEL_NAME
These must match the published iteration name in Azure exactly.
The app opens but Azure features fail
Check that:
- the endpoint URL is correct
- the key is correct
- the project ID belongs to the correct Azure resource
- the model has been published
- Docker was restarted after editing
.env
Restart after changing settings
1
2
docker compose down
docker compose up --build -d
Resources
Image Analysis
Image Classification
Object Detection
OCR / Azure AI Vision Read
Face Detection
Dataset for Training and Testing
Project repository
GitHub Code: Azure Vision Web App