Azure AI Vision: Setup and Model Development Guide (Analysis, Classification, Detection, OCR, Face)
Guide
Table of Contents
Introduction
Azure AI Vision provides a set of cloud-based computer vision capabilities that help developers analyze images, extract text, classify content, detect objects, and work with face-related features without building every model from scratch. It is useful for intelligent document processing, visual search, quality inspection, accessibility, security, and many other real-world AI applications.
Overview
This page gives a practical setup and development guide for the main Azure AI Vision services, including:
- Image Analysis for captions, tags, and visual insights
- OCR / Read Text for extracting printed and handwritten text from images
- Image Classification for assigning labels to images
- Object Detection for locating and identifying multiple objects in an image
- Face-related capabilities for visual identity and facial attribute scenarios
It focuses on how to provision the required Azure resources, access the correct portals, retrieve keys and endpoints, and prepare the services for model training, evaluation, and application integration.
Provision Azure AI Services Resources:
Image Summary Service and OCR / Read Text Service
If your subscription doesn’t already include one, you’ll need to create an Azure AI Services resource to get started.
1. Access the Azure Portal
Go to: https://portal.azure.com
- Sign in using your Microsoft account linked to your Azure subscription.
2. Create a New Azure AI Services Resource
- Click on the “Create a resource”
- Then, search Azure AI services
- Select Azure AI Services.
- Click Create to set up a new multi-service account.
Fill in the required fields:
- Subscription → Select your Azure subscription
- Resource group → Choose an existing one or create a new group
Note: Some restricted subscriptions may not allow creating new groups.
- Region → Choose one of the supported regions:
- East US
- France Central
- Korea Central
- North Europe
- Southeast Asia
- West Europe
- West US
- East Asia
- Name → Enter a unique name for your resource
- Pricing tier → Select Standard S0
Azure AI Vision 4.0 features are currently available only in the regions listed above.
3. Review and Create
- Accept the required terms and conditions.
- Click Create to start deployment.
4. Wait for Deployment
- Allow a few minutes for the resource to be deployed.
- Once completed, open the deployment details.
5. Retrieve Keys and Endpoint
- Navigate to your newly created resource.
- Open the Keys and Endpoint section from Resource Management
You will need:
- Endpoint URL
- One of the API keys
These values will be used in your environment configuration to enable your application to connect to the Azure AI Services for both Image Analysis Service and OCR Service.
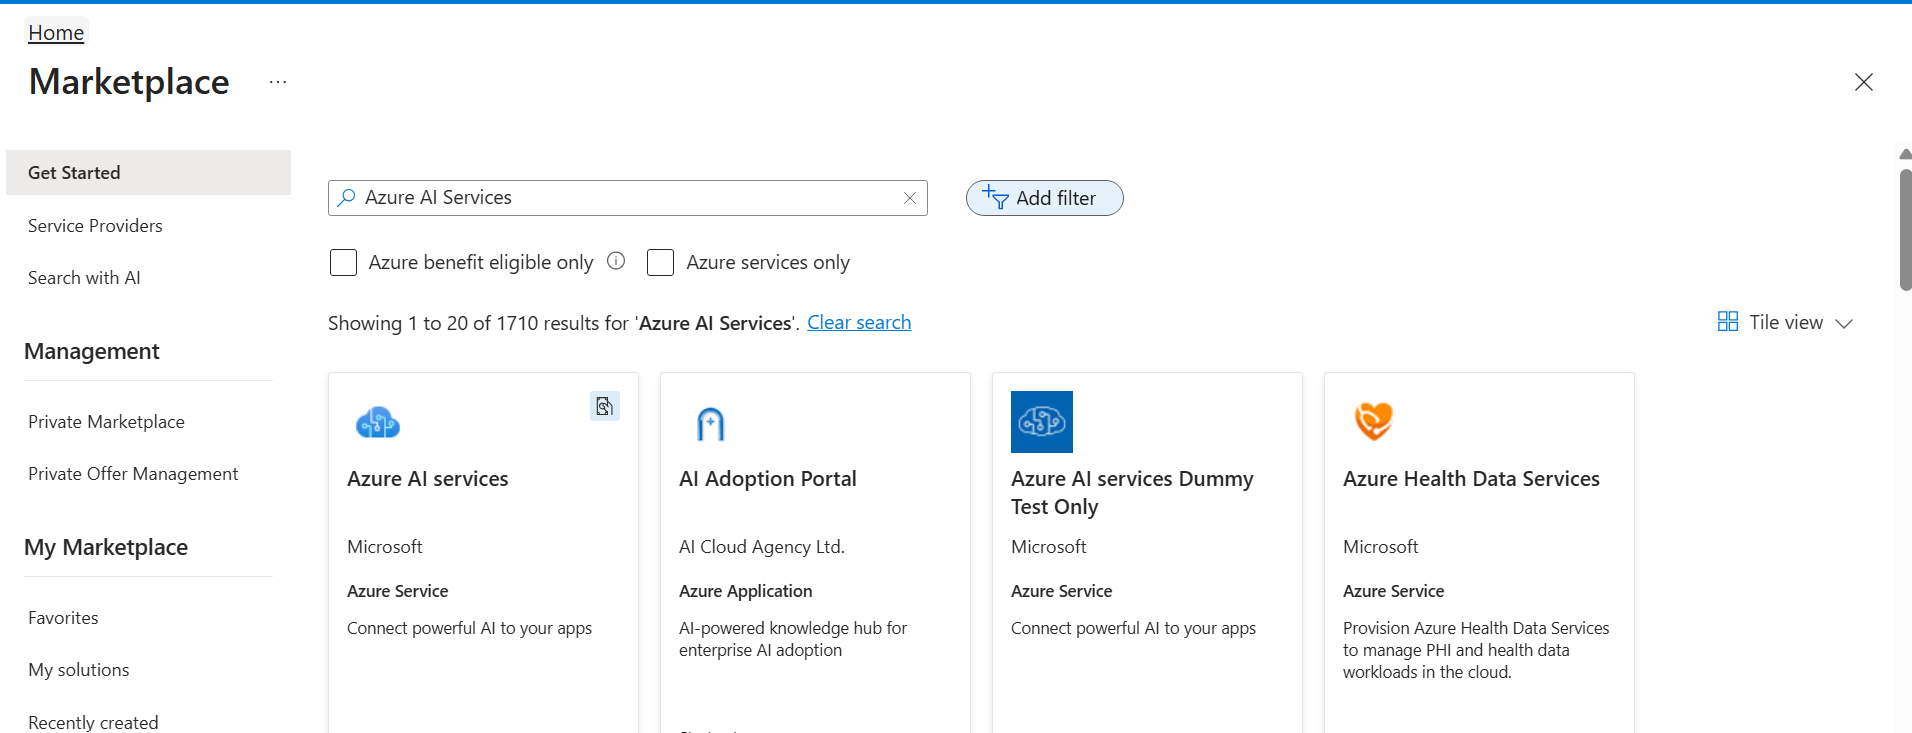
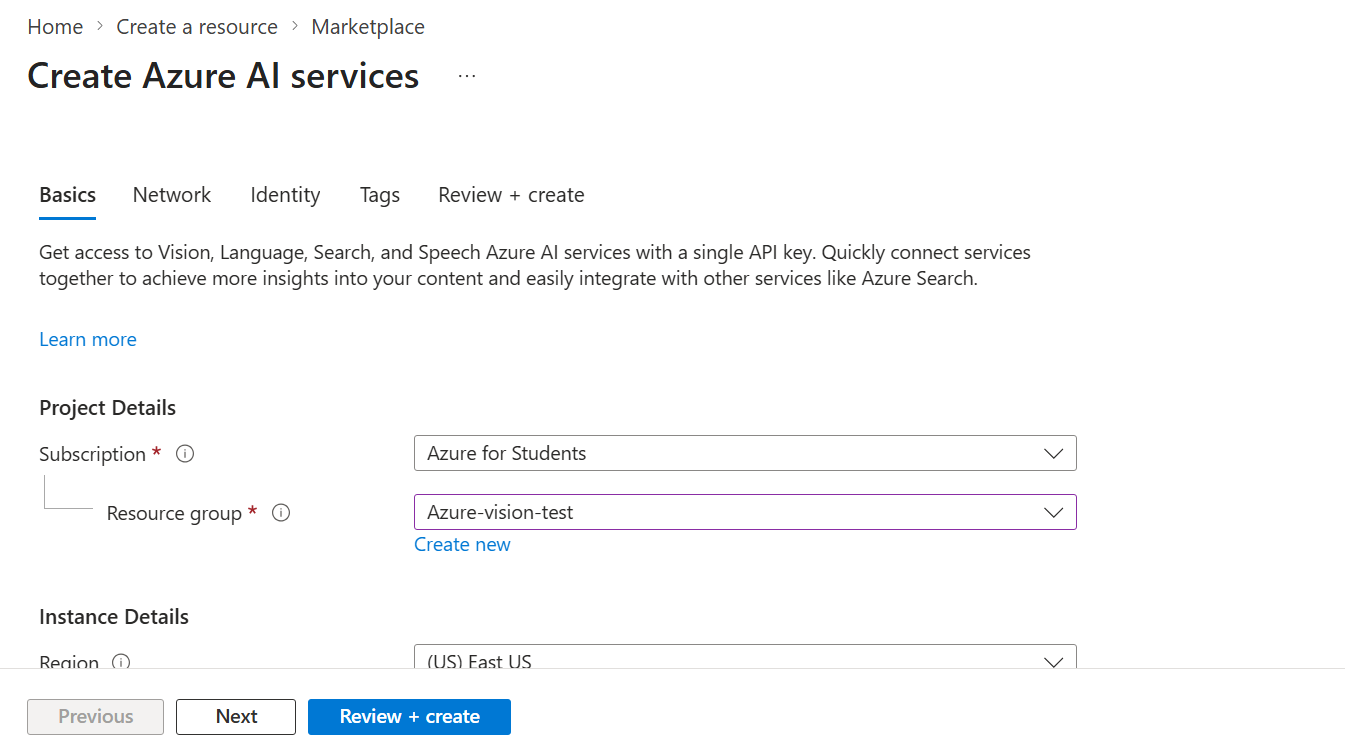
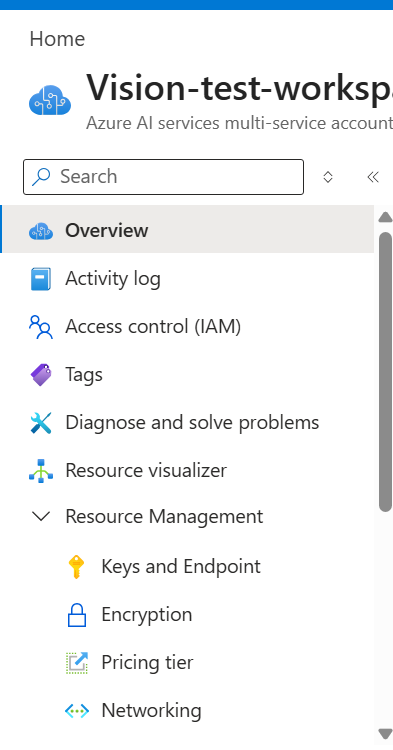
Image Classification Service
1. Access the Azure Portal
Go to: https://portal.azure.com
- Sign in using your Microsoft account linked to your Azure subscription.
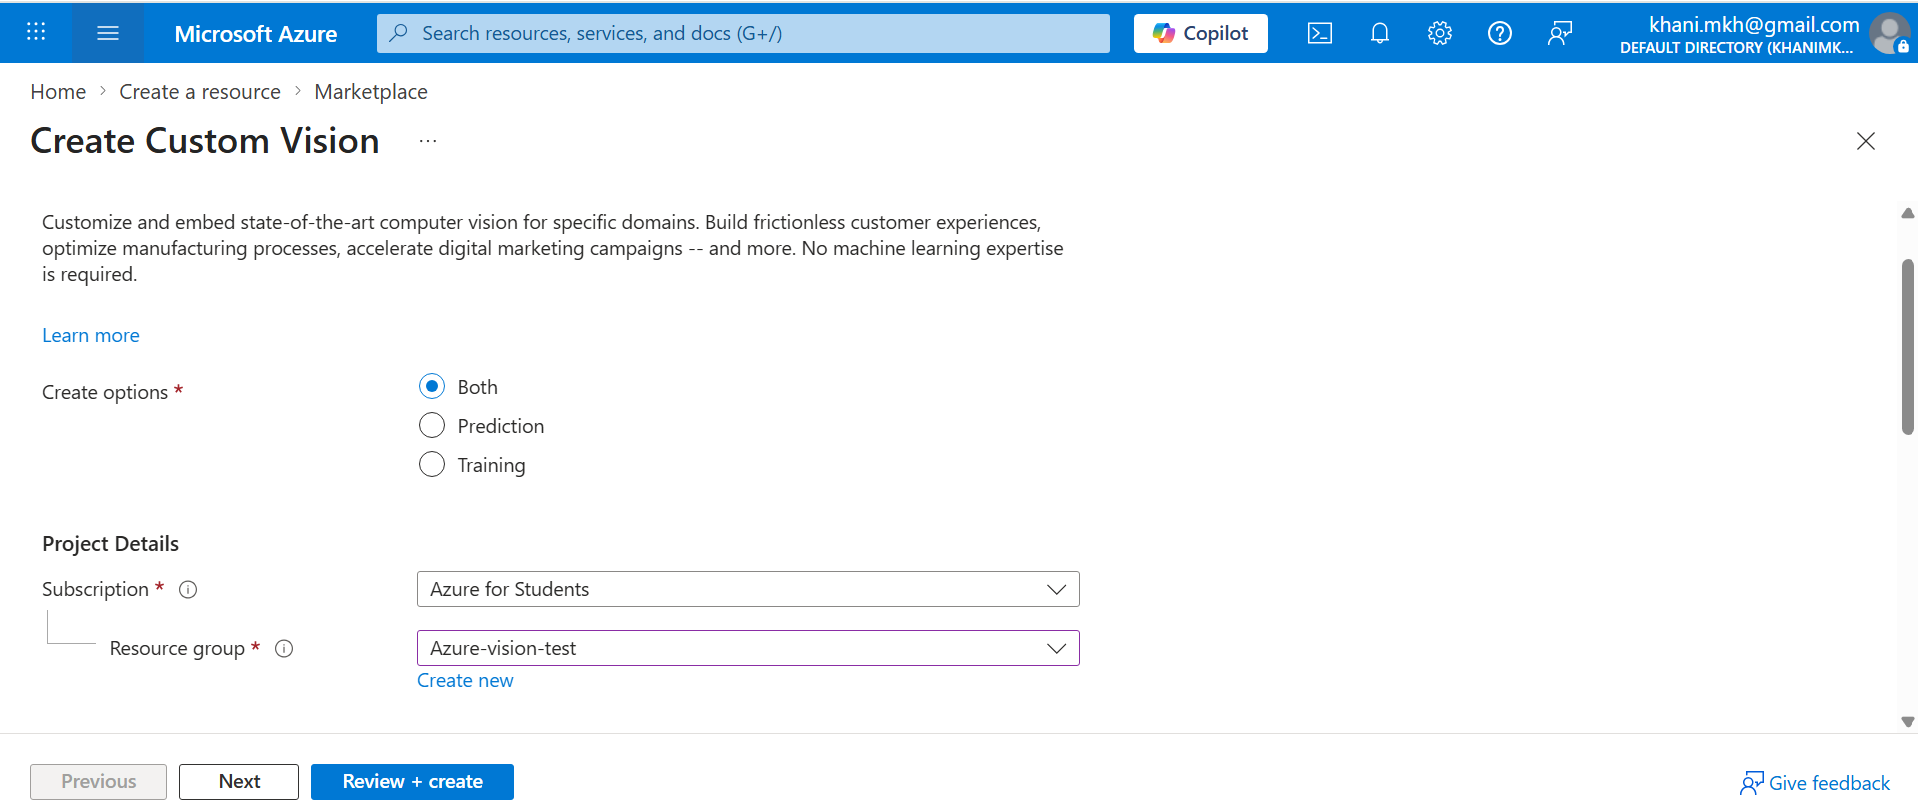
2. Create a Custom Vision Resources
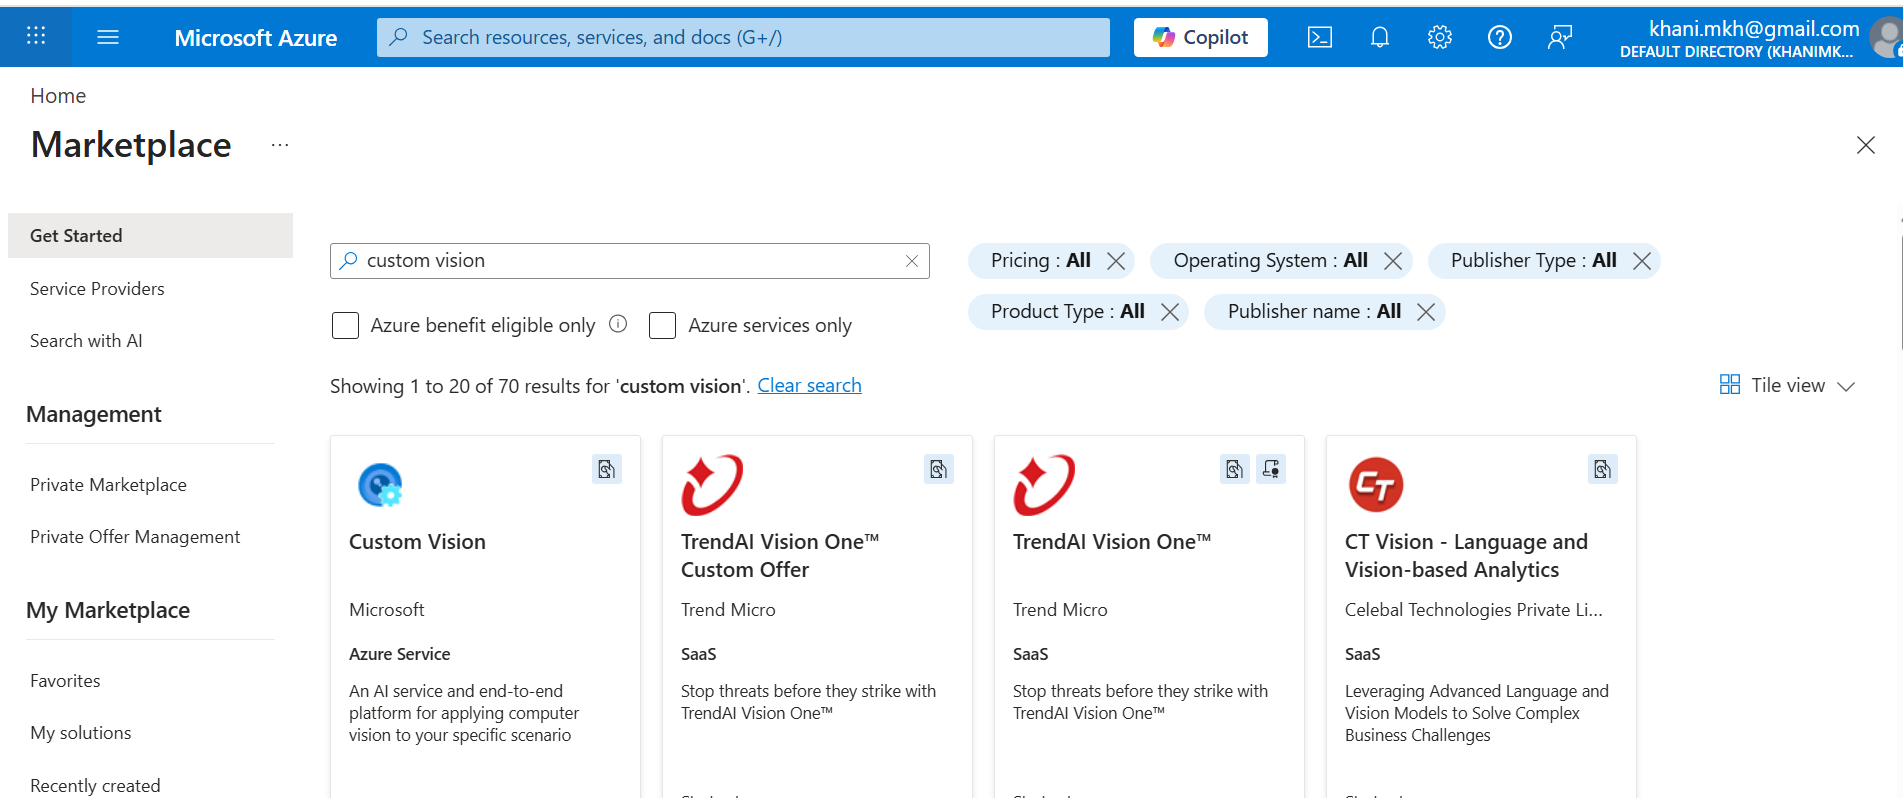
- Click on the “Create a resource”
- Then, search Custom Vision or Vision
- Select Custom Vision.
- Click Create to set up a new multi-service account.
Fill in the required fields:
- Creation option → Select both
- Subscription → Select your Azure subscription
- Resource group → Choose an existing one or create a new group
Note: Some restricted subscriptions may not allow creating new groups.
- Region → Choose one of the supported regions:
- East US
- France Central
- Korea Central
- North Europe
- Southeast Asia
- West Europe
- West US
- East Asia
- Name → Enter a unique name for your resource
- Pricing tier → Select Standard S0
3. Review and Create
- Accept the required terms and conditions.
- Click Create to start deployment.
4. Wait for Deployment
- Allow a few minutes for the resource to be deployed.
- Once completed, open the deployment details.
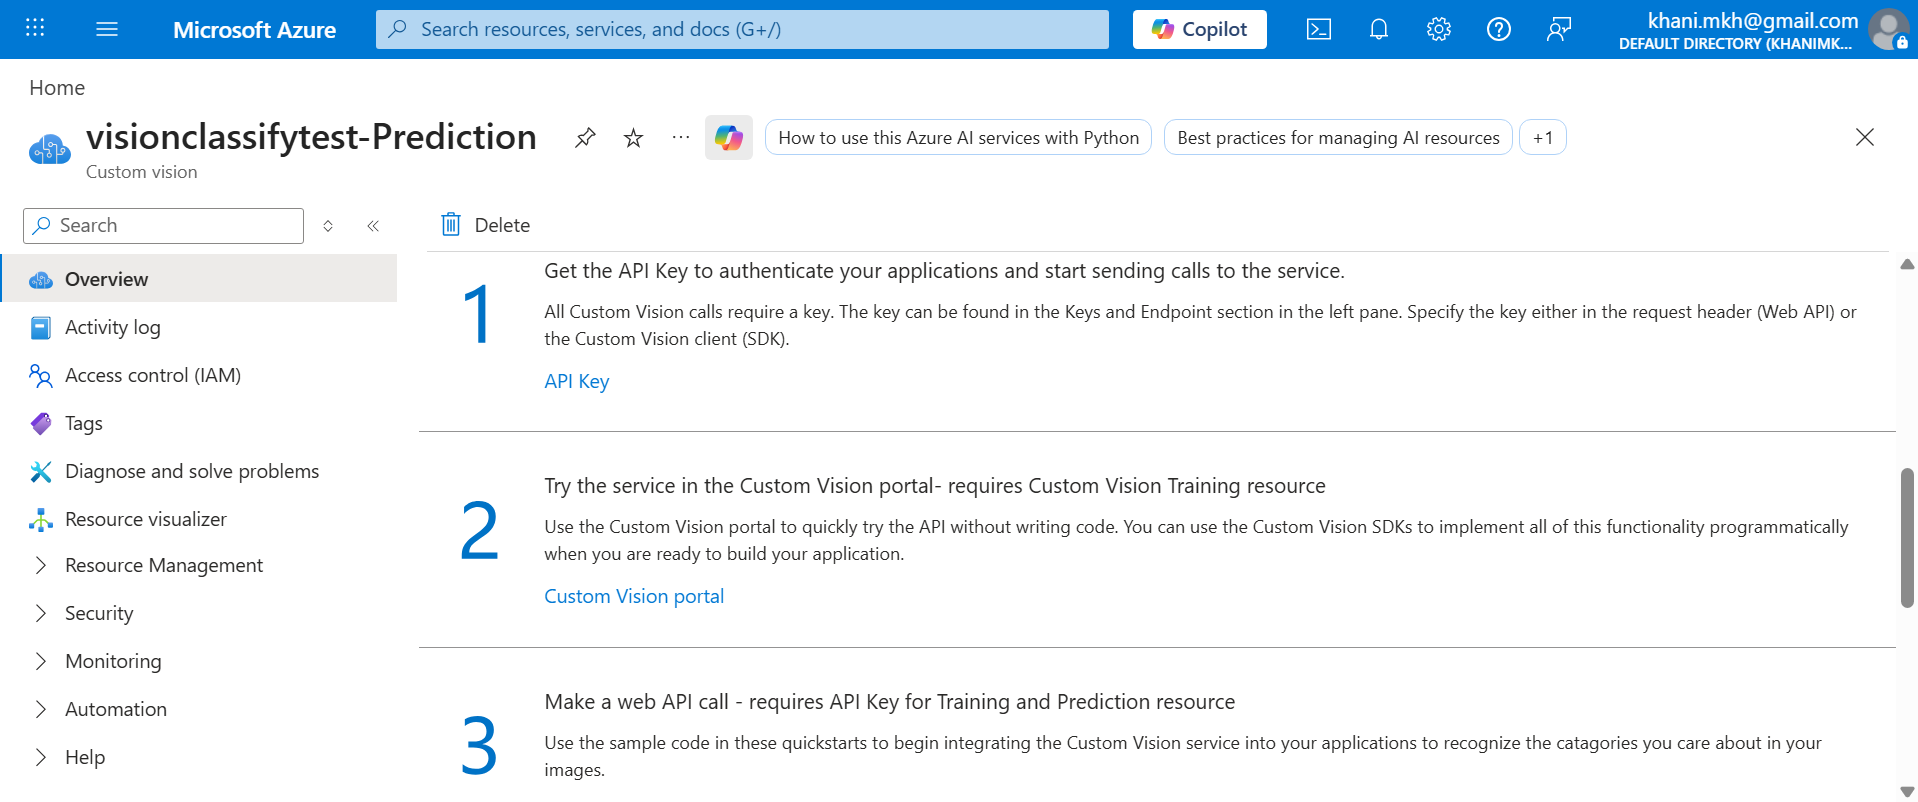
5. Open Custom Vision Portal
- You can go directly to the Custom Vision Portal and sign in with the same Azure account.
- Also you can open it from Azure protal, by navigating to the second steps of Get Started which mentoned “Try the service in the Custom Vision portal- requires Custom Vision Training resource.” and then click on the link of Custom Vision Portal
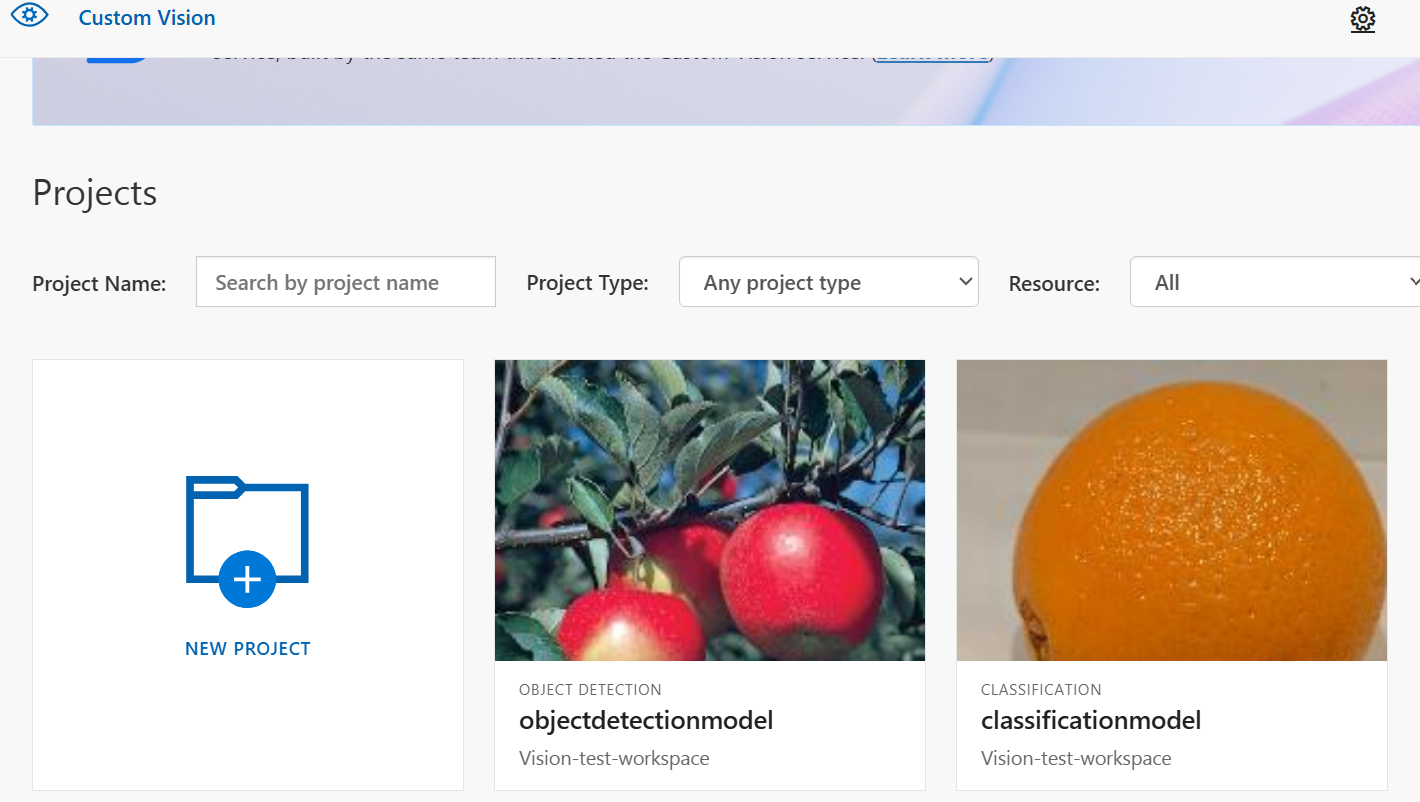
6. Create a New Project
Click New Project, then configure:
- Name → Your project name
- Description → Optional
- Resource → Select your Training resource
- Project Types:
- Classification (for labeling images)
- Classification Types:
- Multiclass (single tag per image)
- Multilabel (multiple tags per image)
- Domains:
- General (recommended)
- Specialized (e.g., food, retail, landmarks) Click Create Project
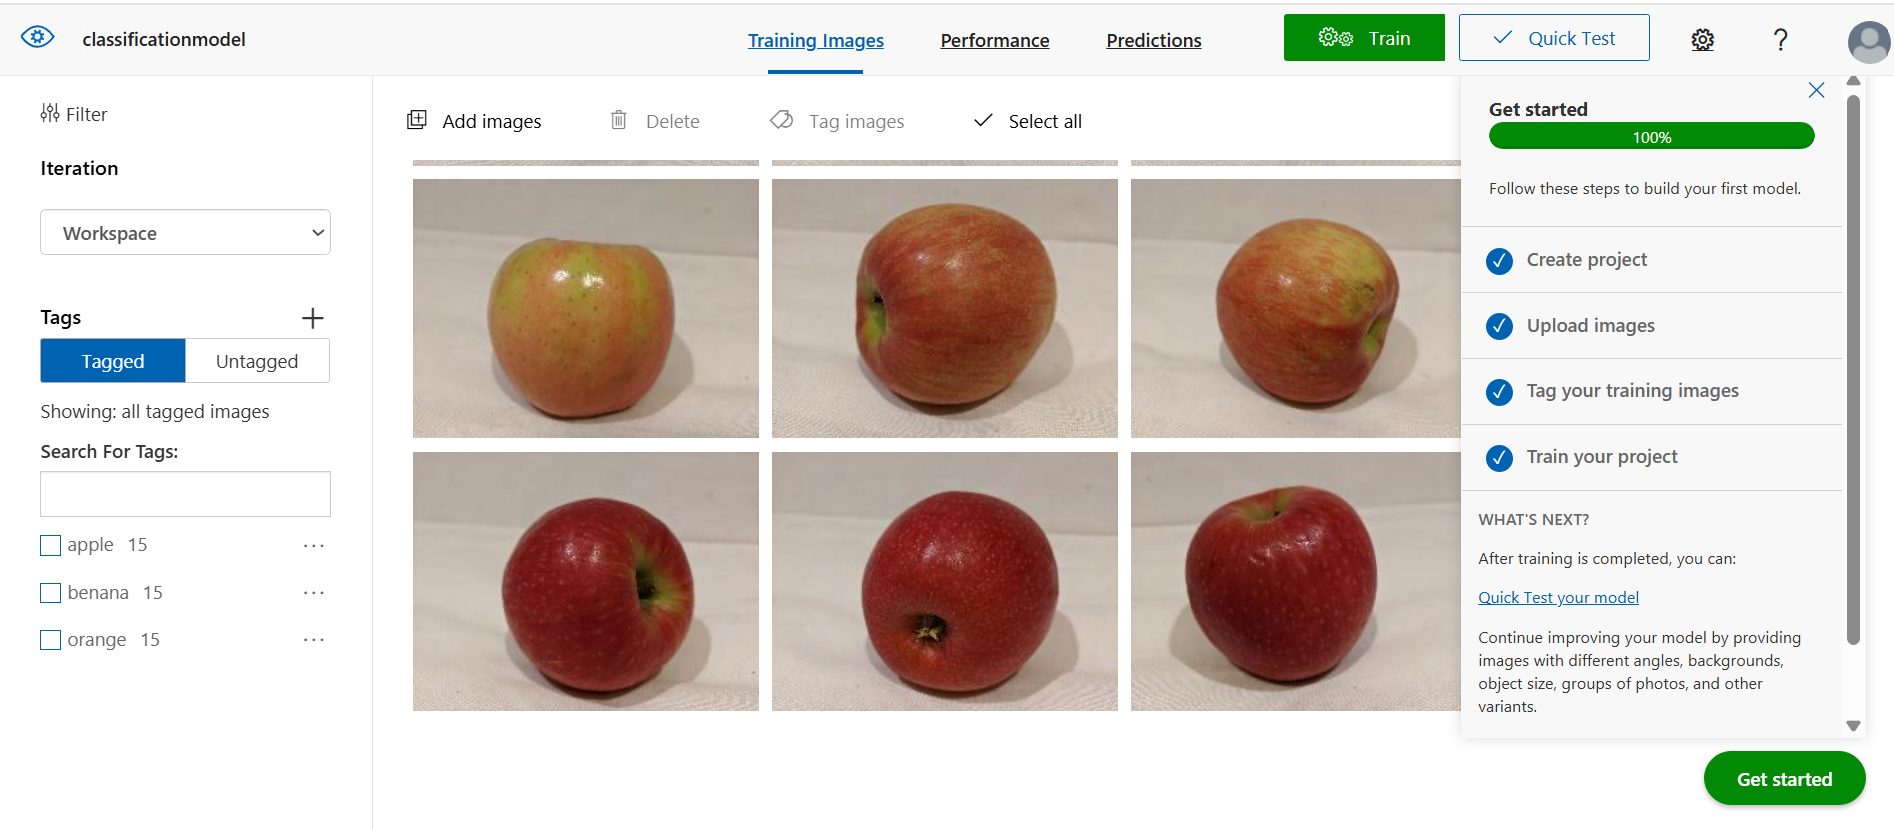
7. Upload Images, Train Model, Evaluation and Imporvement
- Upload Images
- Go to Training Images
- Click Add images
- Upload images and assign tags (labels)
- Train the Model
- Click Train
- Choose:
- Quick Training (faster)
- Advanced Training (better accuracy)
- Check results in Performance tab:
- Precision
- Recall
- mAP (mean average precision)
- Use Quick Test to test with new images
- Improve model:
- Add more data
- Balance classes
- Fix wrong labels
Please read the main documention of microsoft which explain about how train a classification model.
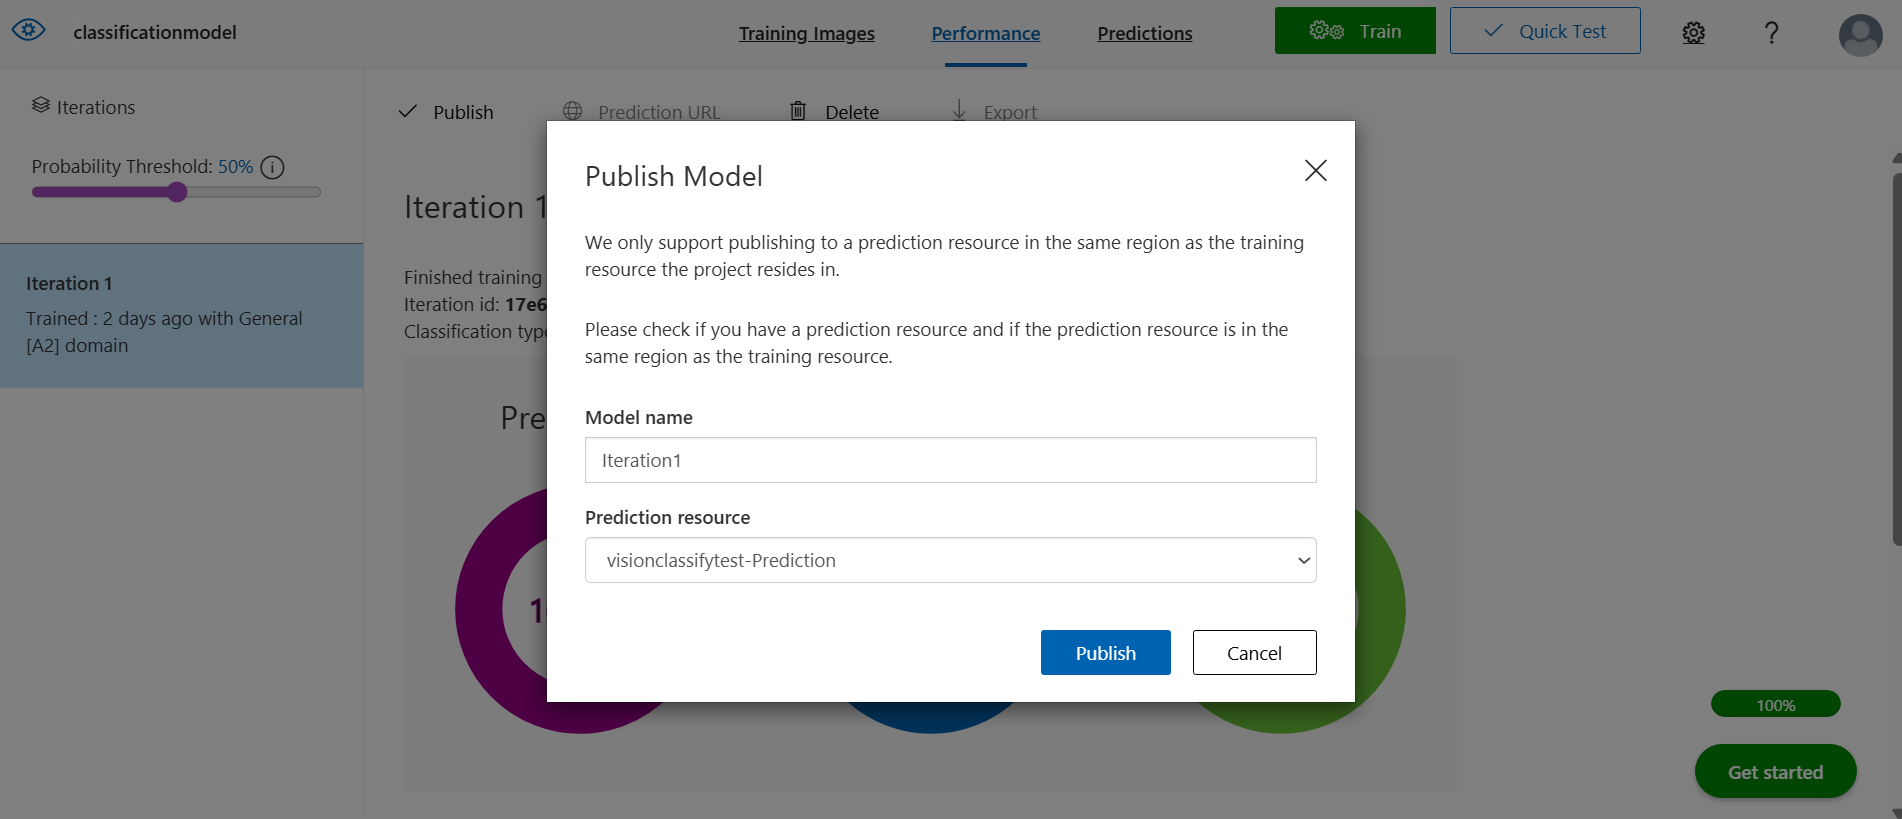
8. Publish the Model and Get the details of Prediction URL
You must publish before using it in an app. Steps: 1- Go to Performance 2- Click Publish 3- Enter:
- Model name
- Prediction resource 4- After publishing:
- Go to Prediction URL
- Copy:
- Prediction endpoint
- Prediction key
These values will be used in your environment configuration to enable your application to connect to the Image Classification Service.
Object Detection Service
1. Access the Azure Portal
Go to: https://portal.azure.com
- Sign in using your Microsoft account linked to your Azure subscription.
2. Create a Custom Vision Resources
- Click on the “Create a resource”
- Then, search Custom Vision or Vision
- Select Custom Vision.
- Click Create to set up a new multi-service account.
Fill in the required fields:
- Creation option → Select both
- Subscription → Select your Azure subscription
- Resource group → Choose an existing one or create a new group
Note: Some restricted subscriptions may not allow creating new groups.
- Region → Choose one of the supported regions:
- East US
- France Central
- Korea Central
- North Europe
- Southeast Asia
- West Europe
- West US
- East Asia
- Name → Enter a unique name for your resource
- Pricing tier → Select Standard S0
3. Review and Create
- Accept the required terms and conditions.
- Click Create to start deployment.
4. Wait for Deployment
- Allow a few minutes for the resource to be deployed.
- Once completed, open the deployment details.
5. Open Custom Vision Portal
- You can go directly to the Custom Vision Portal and sign in with the same Azure account.
- Also you can open it from Azure protal, by navigating to the second steps of Get Started which mentoned “Try the service in the Custom Vision portal- requires Custom Vision Training resource.” and then click on the link of Custom Vision Portal
6. Create a New Project
Click New Project, then configure:
- Name → Your project name
- Description → Optional
- Resource → Select your Training resource
- Project Types:
- Classification (for labeling images)
- Classification Types:
- Multiclass (single tag per image)
- Multilabel (multiple tags per image)
- Domains:
- General (recommended)
- Specialized (e.g., food, retail, landmarks) Click Create Project
7. Upload and Label Images (Key Difference With Classification)
Object detection requires bounding boxes, not just tags.
- Go to Training Images.
- Click Add images.
- Upload images.
- Labeling:
For each image:
- Draw a bounding box around each object.
- Assign a tag (label) to each box.
- Multiple objects per image are allowed.
- Label quality directly impacts performance.
7. Train the Model
- Click Train.
- Choose one of the following options:
- Quick Training → faster
- Advanced Training → better accuracy
8. Evaluate Performance
Go to the Performance tab and check:
- Precision
- Recall
- mAP
Use Quick Test to:
- Upload a new image.
- View detected objects with bounding boxes.
9. Improve the Model
To boost performance:
- Add more labeled images.
- Include different angles, lighting, and backgrounds.
- Balance object classes.
- Correct incorrect bounding boxes.
10. Publish the Model
You must publish before using it in an app.
Steps:
- Go to Performance.
- Click Publish.
- Enter:
- Model name
- Prediction resource
11. Get Prediction API Details
After publishing:
- Go to Prediction URL.
- Copy the following values:
- Endpoint
- Prediction key
These values will be used in your environment configuration to enable your application to connect to the Object detection service.
Face Analysis Service
1. Access the Azure Portal
Go to: https://portal.azure.com
- Sign in using your Microsoft account linked to your Azure subscription.
2. Create a New Azure AI Services Resource
- Click on the “Create a resource”
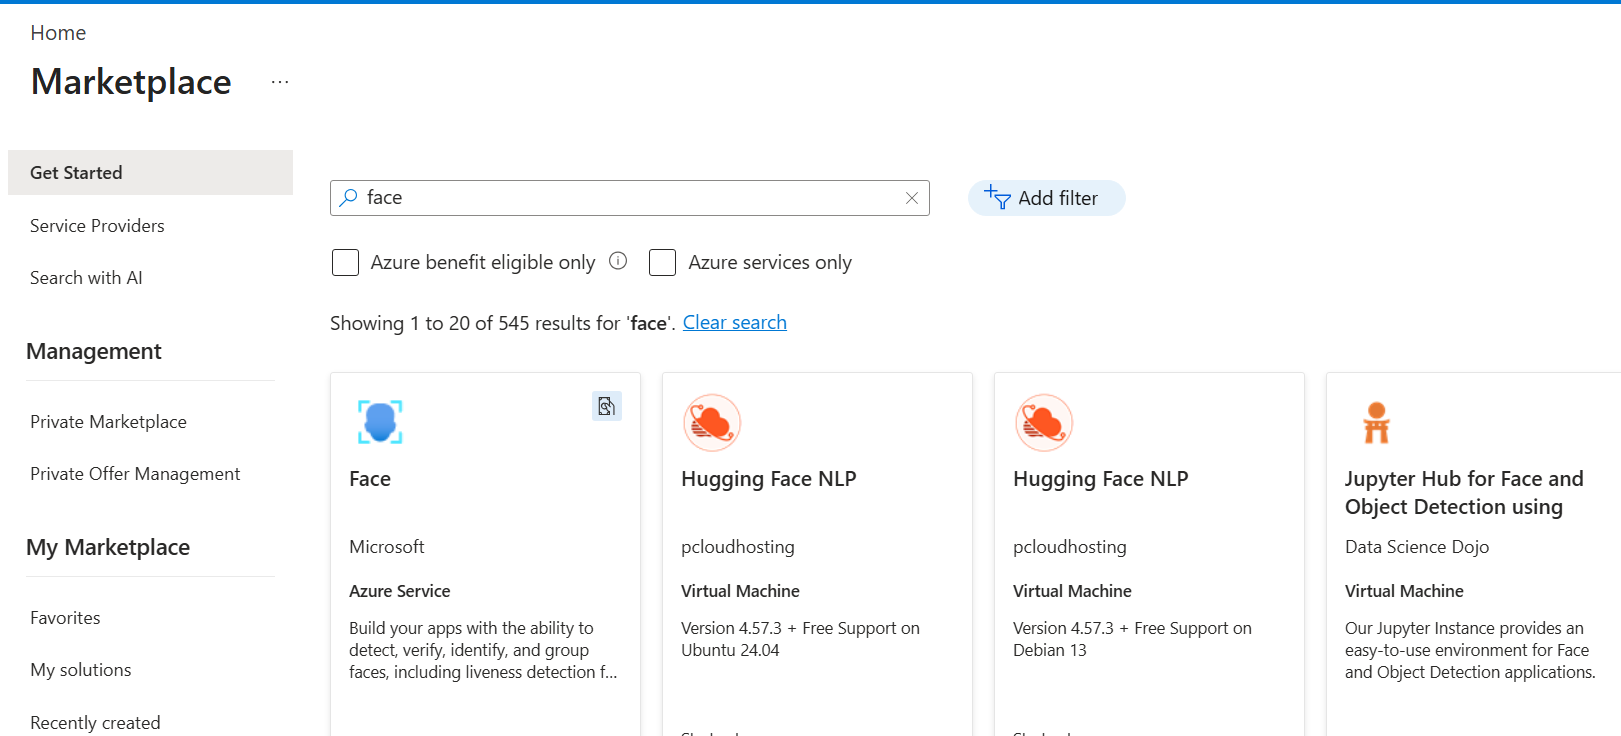
- Then, search Face
- Select Face.
- Click Create to set up a new multi-service account.
Fill in the required fields:
- Subscription → Select your Azure subscription
- Resource group → Choose an existing one or create a new group
Note: Some restricted subscriptions may not allow creating new groups.
- Region → Choose one of the supported regions:
- East US
- France Central
- Korea Central
- North Europe
- Southeast Asia
- West Europe
- West US
- East Asia
- Name → Enter a unique name for your resource
- Pricing tier → Select Standard S0
3. Review and Create
- Accept the required terms and conditions.
- Click Create to start deployment.
4. Wait for Deployment
- Allow a few minutes for the resource to be deployed.
- Once completed, open the deployment details.
5. Retrieve Keys and Endpoint
- Navigate to your newly created resource.
- Open the Keys and Endpoint section from Resource Management
You will need:
- Endpoint URL
- One of the API keys
These values will be used in your environment configuration to enable your application to connect to the Face Detection Service.
Resources
Image Analysis
Image Classification
Object Detection
OCR / Azure AI Vision Read
Face Detection
Dataset for Training and Testing